This guide provides a step-by-step walkthrough of the connection process.
It is recommended to temporarily close sales both on the OTA site and in your SabeeApp account during the channel connection process. This helps ensure a smooth integration and prevents potential issues.
To close sales in your SabeeApp account:
-
Navigate to Distribution→Channel Manager → Dashboard Distribution.
-
Locate the Open/Close Sales button.
-
Deactivate the button to temporarily close sales.
Once the connection is established and all future reservations have been imported and assigned to the correct rooms, remember to reactivate the button to resume sales.

STEP 1. CONNECT SABEEAPP TO BOOKING:COM
1. 1. Start by going to the Booking.com extranet and selecting SabeeApp as your Channel Manager. You can do that by clicking on the account and then select connectivity partner. In the drop down list you should be able to find SabeeApp. After that, return to SabeeApp and navigate to Distribution / Channel Manager/ Inactive channels.
1. 2. Select Booking.com and Click on Connect to Booking.com, which will bring you to the Configuration Page.
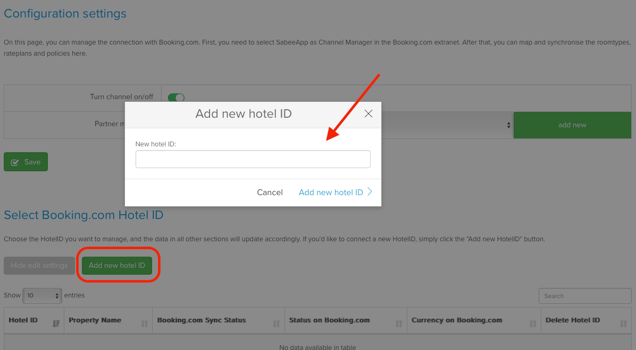
1. 3. Turn channel on and select a partner name:
Booking.com Sync Status:
Use the Booking.com Synch Status slider to enable or disable the connection for a specific Hotel ID:
- Turned Off: Prices, availability, and restrictions won’t sync with Booking.com, but you’ll still receive reservations in SabeeApp.
- Turned On: Everything will sync properly with Booking.com.
Currency on Booking.com:
A new "Currency on Booking.com" column will show the currency for each account. If the currency in SabeeApp doesn't match the currency on Booking.com, a red exclamation mark (!) will appear. Hovering over the exclamation mark will display a warning message.
A pop-up message will explain the effects of turning the slider on or off.

⚠️ Important: If you manage multiple Booking.com accounts, each with its own Hotel ID, you can connect all of them to a single SabeeApp account.
To do this, please follow steps 1–4 mentioned above for each Booking.com Hotel ID individually. Once all accounts Hotel IDs have been saved, you can then continue with the next steps outlined below.
STEP 2. POLICY MANAGEMENT ON BOOKING.COM
Next steps for Mapping is to connect the policies:
In the Policy Management section, you need to link your SabeeApp policies to corresponding policies from the Booking.com extranet.
- SabeeApp Policies Column: Hover over the question mark icon to view details about each SabeeApp policy, helping you select the correct match.
- Booking.com Policies Column: This displays the available Booking.com policies, each with a description to guide your selection.
Remember, each Booking.com policy can only be mapped to one SabeeApp policy, but you can adjust these mappings at any time for flexibility.

STEP 3. ROOM TYPE MANAGEMENT ON BOOKING:COM
NEXT step is to connect the rooms to the corresponding rooms in Booking.com. Here you have 2 options explained in 3.1 and 3.2.
3.1 Mapping existing room types:
If a room type already exists in both the Booking.com Extranet and SabeeApp, you’ll need to map them together.
How to Begin Mapping:
3.1.1 Select your Hotel ID.
3.1.2 Click on the pencil icon ✏️ next to a room type.
3.1.3 Choose "Connect to an existing Booking.com room type".


3.1.4. A table will appear, listing available Booking.com room types to map with your selected SabeeApp room type.


3.1.5. Connect the Room Type
If the required Booking.com room type is listed and active (clickable), simply select it to complete the room type pairing.
If the required room type is listed as active, but unclickable, it means it’s not currently available for connection. In this case, please refer to [this article] for detailed instructions on how to proceed.
3.2 Adding a New Room Type to Booking.com from SabeeApp:
If you want to create a room type that doesn’t yet exist on the Booking.com extranet, follow these steps:


- Select the Hotel ID: Choose the appropriate Hotel ID from the dropdown list. You can use the search bar to find it quickly. (1)
- Create the New Room Type: Click the pen icon, then select “Create new room type on Booking.com.” (2, 3)
- Configure Room Attributes: After creating the room type, go to Settings > Room Types and open the "Available units on Booking.com" section. Here, you can adjust the room type’s attributes as needed.
- Finalise in Room Type Management: Once created, your new room type will appear in the Room Type Management section. This section displays all room types for every Hotel ID, so selecting a specific "Booking.com Hotel ID" here isn’t necessary.
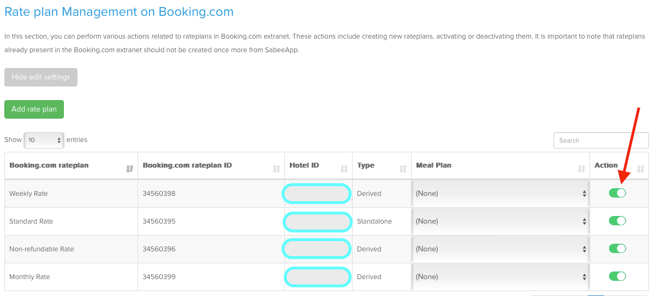
STEP 4: RATE PLAN MANAGEMENT ON BOOKING.COM
In this section, you can manage your Booking.com rate plans directly from the SabeeApp interface. This includes creating new rate plans and activating or deactivating existing ones.
Important: If a rate plan already exists in your Booking.com extranet, you do not need to recreate it in SabeeApp. This feature is intended for creating new rate plans on Booking.com without logging into the extranet.
Example: If you want to connect a Double Room to both a Standard and a Non-Refundable rate plan, but only the Standard rate plan exists in Booking.com, you can create the Non-Refundable plan in SabeeApp and send it directly to Booking.com.
4. 1. Adding a New Rate Plan:
To add a new rate plan, click the "Add Rate Plan" button. A new row will appear in the table where you can:
-
- Name your rate plan.
- Assign a meal plan to the rate plan

![]()
4. 2. Selecting the Meal Plan:
Choose the meal plan you want to offer to your guests with this rate plan, or leave the selection set to "None" if no meal plan is included.You can update the meal plan assigned to a specific rate plan at any time by editing the Meal Plan column.
After entering all required details, click Create. The new rate plan will be added to the selected extranet within seconds.
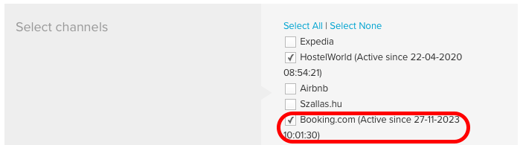
4. 3. Check Activation
Once the rate plan is connected, you can verify its activation date in the Prices menu. Go to the relevant rate plan and look under the Select channel section to find the activation date.
4. 4. Connect to Room Types
After the rate plan is created, go to the Synchronisation Settings and click Add New to connect the new rate plan to the appropriate room types. Select all relevant sections.

![]()
Click the "Show Edit Settings" button to display a table with all the rate plans associated with the Hotel ID you're working with. From here, you can easily deactivate or reactivate specific rate plans, just like in the Room Type Management section, by clicking on the green toggle in the Action section.
STEP 5. FINAL STEP: CONNECTING SABEEAPP AND BOOKING:COM
To complete the connection, go to the Synchronization Settings section. Here, all the room types you've mapped in the Room Type Management section will automatically appear once. If you need to link the same room type to more than one rate plan, click Add New to insert a new row in the table and proceed the same way:

-
Select Required Settings:
- Choose the SabeeApp Rate Plan.
- Set the Default Occupancy.
- Select the Default Policy.
-
Update the Connection:
Once you've selected these settings, an Update button will appear at the end of the row. Click this button to finalise the connection process.
For more details on the buttons in the synchronization table, see the information below:
HotelID:
In the "Select Booking.com Hotel ID" section, you will find the Hotel ID for reference.
Booking.com Room Type:
This corresponds to the room type name on Booking.com's extranet.
Booking.com Rate Plan:
The name of the rate plan assigned to the specified room type on Booking.com.
SabeeApp Room Type:
The room type's name as listed in SabeeApp.
SabeeApp Rate Plan:
The specific rate plan in SabeeApp that you want to associate with the selected Booking.com room type and rate plan combination.
Default Occupancy:
Choose the occupancy level from SabeeApp that you want to synchronise with the specified SabeeApp rate plan on Booking.com.
Tool Kit: If the Accept Children toggle is enabled in the Other Policies settings, the default maximum number of children per room is set to maximum room occupancy - 1. For example, in a Family room with a max occupancy of 4, this could mean a mix of adults and children, with up to 3 children allowed.
For Booking.com, you can adjust this number if needed.
To set this up:
- Go to Settings > Room Type.
- Click Edit for the desired room type.
- Disable the toggle for Use default Children Policy settings.
- Scroll to the Maximum Number of Children field under Room Type Details for Booking.com and specify the desired limit.
- Click Next and Finish.
Important Notes:
- These settings apply only to Booking.com and do not affect other channels.
- If no specific value is set, the default will be SabeeApp’s setting (either 0: if children are not accepted or maximum occupancy - 1: if children are accepted)
Default Policy:
This is the policy linked to your room rate. Only SabeeApp policies mapped in the "Policy Management" section can be selected here.
Minimum Advanced Booking Offset :
Specifies the minimum time duration in advance until guests can book a date. This is not a mandatory settings.
Maximum Advanced Booking Offset:
Specifies the maximum time duration in advance for guests to book a date. This is not a mandatory settings.
Update:
After applying all the settings, a green Update button will appear at the end of the row. Click this button to synchronize all your settings and mappings.
This button will only appear in the future if synchronisation with Booking.com is necessary due to a recent change.
Add New:
Click this button to add a new mapping for the selected Hotel ID. This is useful when connecting a single room type to multiple rate plans.
By default, each room type appears only once in the synchronization table. If you need to link the same room type to more than one rate plan, click Add New to insert a new row in the table. Then, select the same room type again and complete the rest of the connection process as described above.

Remove the mapping for a specific room rate if you no longer wish to synchronise it.
STEP 6. IMPORTING FUTURE RESERVATIONS FROM BOOKING:COM
When connection to a new Hotel ID is established, you can import existing future reservations:

-
Successful Import: A popup message will confirm the import with the text: “We have successfully imported /%numberofimportedreservations%/ reservations for Hotel ID /%hotelid%/.”
-
No Reservations Available: If no reservations were imported, or if there are none to import, you’ll see a warning message.
-
Reservation Status:
- If reservations have already been imported for this Hotel ID, their details will appear next to the import button.
- If no reservations have been imported, this will also be indicated.
-
Removing Imported Reservations: To delete previously imported reservations, simply click the "Remove Imported Reservations" button.
Additional settings that can be applied:
Activating/Deactivating Previously Mapped Room Types:

When you deactivate a room type, all room rates, availability, and reservations are removed on Booking.com. In the Booking.com extranet, this may appear as if the room type has been deleted. However, reactivating this room type will restore the original one, not create a new one. When deactivating a room type the following pop-up window comes up:

Important Points to Note:
- Room Rates and Availability: Deactivating a room type deletes its room rates and availability. Upon reactivation, you’ll need to set up new room rates (products) on Booking.com, as the previous ones won’t be restored.
- Mapping Requirements: Once we receive confirmation from Booking.com that the deactivation was successful, the mapping is deleted on our end as well. You’ll need to remap the room type after reactivation; otherwise, we won’t resume sending prices, availability, or other data.
- When reactivating the room type the following pop up messages comes up:

🔗 Connection Short Summary
-
Close Sales
Temporarily close sales in both your SabeeApp and OTA (e.g., Booking.com) to avoid sync issues. -
Connect to Booking.com
-
Choose SabeeApp as your Channel Manager in the Booking.com extranet.
-
In SabeeApp, go to Distribution → Channel Manager → Inactive channels and click “Connect.”
-
-
Add Hotel ID & Enable Sync
Add your Booking.com Hotel ID, enable the channel, and check sync and currency settings. -
Map Policies
Link your SabeeApp policies to those available on Booking.com. -
Map Room Types
Either connect existing room types or create new ones on Booking.com via SabeeApp. -
Set Up Rate Plans
Create or connect rate plans and link them to your room types. -
Final Synchronization
In Synchronization Settings, pair everything (room types, rate plans, occupancy, policy) and click Update. -
Import Future Reservations
Once connected, import all future bookings into SabeeApp.
Once the connection to booking.com is successful, please check out our next article: What to expect after connecting to Booking.com?