1. What is the VIZA system?
VIZA is an IT storage platform created by the Hungarian Tourism Agency. It supports the digitalization of the accommodation sector and primarily serves crime prevention purposes.
Since September 1, 2021, all accommodation providers in Hungary are legally required to scan guest documents using an ID scanner and upload the data to the VIZA system.
2. Prerequisites for Data Submission
In order to send guest data from your SabeeApp account to the VIZA system, the following conditions must be met:
2.1. NTAK Connection
- Make sure your SabeeApp account is connected to your NTAK account (Settings → NTAK Settings).
- VIZA uses the NTAK ID provided during this setup to identify your accommodation.
- If you manage multiple NTAK accounts (Multi-NTAK module), ensure that rooms are linked to the correct NTAK account. You can read more about the NTAK connection process here.
2.2. ID Scanner Device
- Data submission to VIZA is only possible through ID document scanning.
- You must activate at least one scanner solution in your account:
- SabeeApp Smart Solutions module (Front Office Manager and Guest Advisor apps), or
- a partner solution, such as the **ARH ComboScan device** (Settings → Marketplace).
2.3. Activating the VIZA Module
- In Settings → Subscription, activate the VIZA module by switching the toggle on.
- Once payment is completed, the connection will be automatically enabled.

3. Data Submission Process
3.1. Document Scanning
- Guest data is collected via the activated ID scanner.
Based on the selected ID scanning solution, the process can start differently.
If you have selected to use SabeeApp's Smart solutions, please find more information here.
If you have selected any of the ARH scanning devices please check the following help article.
- The following information must be submitted for each guest:
- First name, last name
- Maiden name
- Mother’s name
- Date and place of birth
- Nationality
- Gender
- Document type and number
- For guests from non-EU countries, an additional section will appear for visa or entry permit details. These fields are not always mandatory.

3.2. Verifying Guest Data
- Scanned data appears on the guest card.
- Verify that all information is accurate.
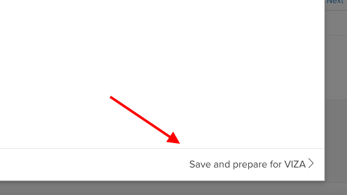
- To finalize, click the “Save and prepare for VIZA submission” button.
- This button is only active if the VIZA module has been previously activated.
3.3. Updating Booking Status
- After recording guest data, update the booking status to:
- “Checked-in”, or
- “Onboard” (if using Smart Solutions module).

3.4. Submitting Data to VIZA
- Once all guest cards are filled, the “Report to VIZA” button will appear.

- On the submission overview page:
- Check that all required fields are filled.
- Missing data can still be entered manually.
- Submission is only possible with complete data sets.
- Submission options:
- Report All – sends data for all guests.
- Report selected only – only sends data for the guests you choose.

- After submission:
- The process closes automatically.
- SabeeApp forwards the data to VIZA.
- Booking history will show the submission.
- A purple (information is being processed and on the way to the VIZA database) → green icon marks a successful submission (VIZA report was successful).


4. Troubleshooting
- If the icon does not turn green after a while, check the PMS → VIZA menu for error messages.
- Once a guest has been reported to VIZA, you cannot rescan their ID in the Front Office Manager app.
- In case of a malfunctioning scanner or guests under 14, the law allows manual data entry.
5. Key Points to Remember
- VIZA data reporting is mandatory for all accommodations.
- Guest data must be scanned with an ID reader.
- The VIZA module must be activated for reporting to work.
- SabeeApp automatically forwards submitted data to VIZA.
- A green icon next to guest data confirms successful submission.