1. About This Guide
This document explains, step by step, how to configure Google Tag Manager (GTM) so that every key step of the SabeeApp 4.0 Booking Engine reservation funnel is measured as a separate event in Google Analytics 4 (GA4). It is written for property owners, marketing managers and agency operators who want a clean, repeatable setup that works for any property — without writing a single line of code.
The instructions assume no prior GTM experience. Wherever a button, menu or field is mentioned, it is named exactly as it appears in the Google Tag Manager interface (in English). All values that are unique to a specific property are written as placeholders inside square brackets, for example [Property Name] or [Property Slug]. Replace each placeholder with the value that belongs to your own property when you perform the steps in your own container.
By the end of this guide you will have a fully working measurement setup that fires five GA4 events (one per funnel step) and that can be verified in real time using GTM Preview mode and the GA4 DebugView.
Who this guide is for
- Property owners and reservation managers who manage their own GTM container.
- Digital marketing teams and agencies that implement tracking for hospitality clients.
- SabeeApp partners and consultants who need a standardised setup that can be rolled out across multiple properties.
What you will build
You will build a single, clean tracking architecture made of three layers, all inside the same GTM container:
- One Constant Variable that holds your GA4 Measurement ID. This means you only ever store the ID in one place; if you ever need to change it, you change it once.
- One Google Tag (the modern unified Google tag) that loads on every page of the booking engine and acts as the foundation for all GA4 measurement.
- Five Triggers — one for each step of the reservation funnel — combined with five GA4 Event Tags that fire those triggers and send a uniquely named event to GA4.
The five steps of the SabeeApp BE funnel
The SabeeApp 4.0 Booking Engine guides every guest through the same five visual steps. The setup in this guide attaches one GA4 event to each of those steps so that, in your GA4 reports, you can see exactly how many guests reach Date Pickup, how many continue to Search Results, and so on, all the way down to Confirmation.
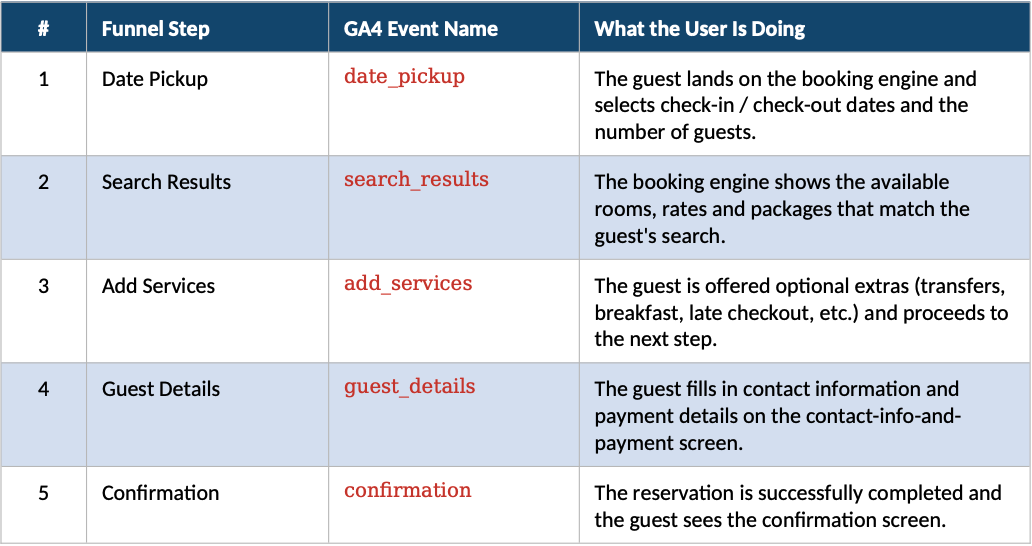
The five event names (date_pickup, search_results, add_services, guest_details, confirmation) are intentional and consistent across all SabeeApp partner properties. Please use exactly these names. They are written in lowercase with underscores because GA4 treats event names as case-sensitive identifiers, and any deviation will create a separate, unintended event in your reports.
2. Before You Begin: Prerequisites
Before opening Google Tag Manager, please make sure that the following five items are ready. Skipping any one of them will block you partway through the setup, so it is worth double-checking each one upfront.
2.1 Connecting Google Analytics (GA4) and Google Tag Manager (GTM) to SabeeApp
First, complete the setup in SabeeApp by following this guide:
👉 Connecting Google Analytics (GA4) and Google Tag Manager (GTM) to SabeeApp
Make sure you complete all steps, including the Final Step, where you inform your account manager after the connection is completed in the Marketplace.
This step is required before continuing with the GTM configuration in this advanced guide.
⚠️ Important: Why this step must be completed first
The connection in SabeeApp must be completed at the beginning of the process because:
- GA4 and GTM require time to start collecting and processing data
- Delaying this step may result in missing or delayed reporting data, which can be mistaken for a setup issue
- The GTM container must be properly installed on all Booking Engine pages
🔧 Technical requirement
The GTM container snippet must be present on every page of the SabeeApp Booking Engine. This is handled by your SabeeApp Account Manager after the Marketplace connection has been completed.
Without this installation, the tracking setup described in this guide will not function correctly.
2.2 Editor access to the container
Your Google account must have at least the Edit permission on the container so that you can create variables, triggers and tags. View-only access is not sufficient.
2.3 A GA4 property and a Measurement ID
You need a Google Analytics 4 property for the same website / property and you need to know its Measurement ID. The Measurement ID always starts with the letter G followed by a dash and a 10-character alphanumeric code, for example G-XXXXXXXXXX. You can find it inside Google Analytics under Admin → Data Streams → click on your web stream → it is shown at the top right of the stream details page.
2.4 Your Property Slug
This is the most property-specific value in the entire setup, and the only one that requires a small amount of detective work. The Property Slug is the part of your booking-engine URL that identifies your property inside SabeeApp's 4.0 system. It always sits between /v3/p/ and the next slash or question mark. To find it:
4. Open your property's booking engine in a normal browser tab (the same link your guests would use to start a reservation).
5. Look at the address bar. The URL will look like https://ibe.sabeeapp.com/v3/p/[Property-Slug]?lang=en&...
6. Whatever is written in the position marked [Property-Slug] above is your Property Slug. Write it down exactly as it appears, including any dashes and capitalisation. You will need to paste this value into five different trigger filters later in this guide.
Throughout this document, this value is referenced as [Property Slug]. Please remember the exact spelling — capital letters and dashes matter.
2.5 A test reservation environment
Finally, you need to be able to step through your own booking engine without actually charging a card. We will use this at the very end of the guide to verify that the events fire correctly in GTM Preview mode and in the GA4 DebugView. If you are unsure how to safely run a test reservation, please ask your SabeeApp account manager for guidance.
3. How the Tracking Works
Before clicking anything in GTM, it helps to understand the underlying mechanism so that the steps that follow feel natural rather than mechanical. The SabeeApp 4.0 Booking Engine is a so-called Single Page Application, which means that when a guest moves from one step of the funnel to the next, the browser does not actually reload the page. Everything happens in the same web page; only the contents on the screen change.
This is important because GTM's classic Page View trigger only fires on real, full page loads. If we relied only on Page View, GTM would only fire once — at the very first step — and we would never see Search Results, Add Services, Guest Details or Confirmation in our reports.
To solve this, SabeeApp's booking engine pushes a virtual page-view signal into the browser's dataLayer every time the guest moves to a new step. The signal is a JavaScript object that contains event: "page_view". GTM listens for those signals using a Custom Event trigger. Then, to make sure the right event fires on the right step, each Custom Event trigger is combined with a Page URL filter that checks the unique part of the URL for that step (for example /services for the Add Services step).
The very first step (Date Pickup) is slightly different. Because it happens immediately on the initial page load, we use a regular Page View trigger for it instead of a Custom Event. The other four steps all use Custom Event triggers.
In short, the architecture is: one shared Measurement ID variable, one base Google Tag that loads the GA4 library, and five small GA4 event tags — each fired by its own carefully scoped trigger. Once you have built it, the same pattern can be copied to any other SabeeApp property by changing only two values: the Measurement ID and the Property Slug.
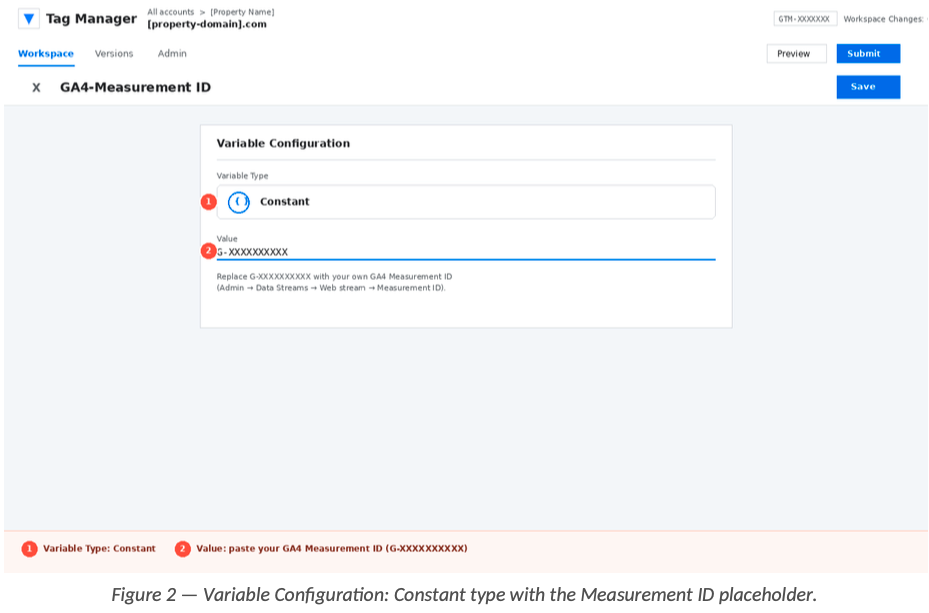
4. Step 1 — Create the Constant Variable for the GA4 Measurement ID
We begin by creating a single User-Defined Variable that stores your GA4 Measurement ID. The advantage of using a variable instead of typing the ID directly into each tag is that you store the ID in exactly one place. Later, if your GA4 property ever changes, you only have to update one variable and every event tag will automatically use the new value.
4.1 Open the Variables screen
7. Sign in to https://tagmanager.google.com with the Google account that has Edit access to the container.8. In the left-hand sidebar, click Variables.
9. Scroll down to the User-Defined Variables section and click the blue New button on the right.
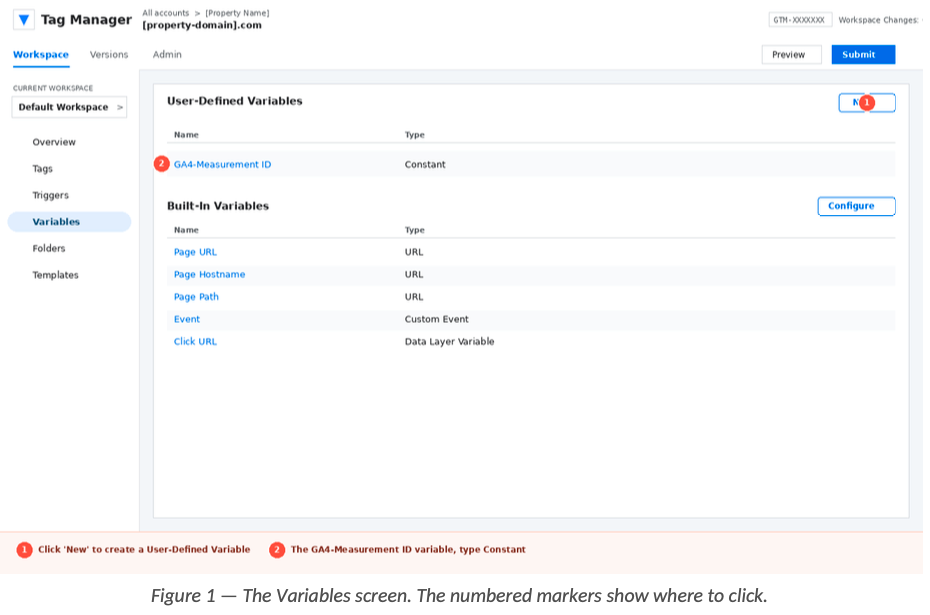
4.2 Configure the variable
10. At the very top of the panel, click the small pencil icon next to Untitled Variable and rename it to GA4-Measurement ID. Use this exact spelling, including the dash and the capitalisation, because the event tags in this guide will reference it by name.
11. Click anywhere inside the Variable Configuration box to open the variable type chooser.
12. Under the Utilities group, choose Constant.
13. In the Value field, paste your GA4 Measurement ID — the value that looks like G-XXXXXXXXXX. Make sure there are no leading or trailing spaces.
14. Click the blue Save button in the top-right corner.
You should now see a single user-defined variable named GA4-Measurement ID in the Variables list. It is the foundation of everything that follows.
5. Step 2 — Create the Base Google Tag
Next we create the foundational Google Tag (sometimes called the gtag.js loader). This is the tag that actually loads the Google Analytics measurement library inside the visitor's browser. Without it, none of the GA4 event tags would have a working library to talk to. It needs to fire as early as possible on every page of the booking engine, which is why we attach it to the built-in Initialization - All Pages trigger.
5.1 Open the Tags screen
15. In the left-hand sidebar of GTM, click Tags.
16. Click the blue New button at the top right of the tag list.
5.2 Configure the tag
17. Click the pencil icon at the top of the panel and rename the tag to Google Tag - Page View.
18. Click inside the Tag Configuration box and pick Google Tag (the icon shows a small blue tag).
19. In the Tag ID field, paste your GA4 Measurement ID, again the value that looks like G-XXXXXXXXXX. (You can either type it directly here, or click the small Lego-brick icon to the right of the field and pick the variable you created in Step 1. Both options work; using the variable keeps things consistent.)
20. Leave the Configuration settings section empty unless you have a specific reason to override it. The defaults are correct for the SabeeApp BE setup.
5.3 Attach the trigger
21. Scroll down and click inside the Triggering box.
22. Choose Initialization - All Pages from the list. (This trigger ensures the Google Tag fires before any other tag in the container, which is what we want for the foundation.)
23. Click the blue Save button in the top-right corner.
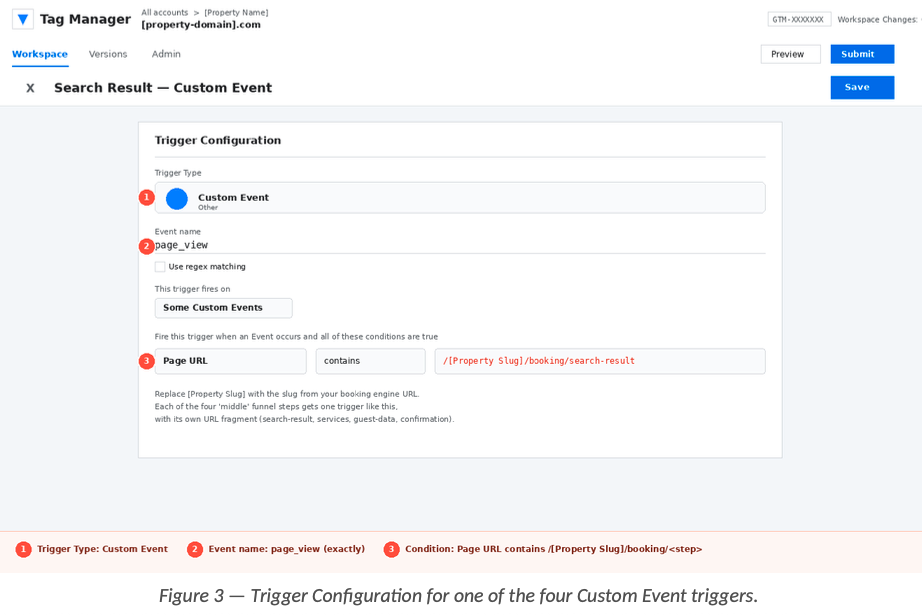
6. Step 3 — Create the Five Triggers
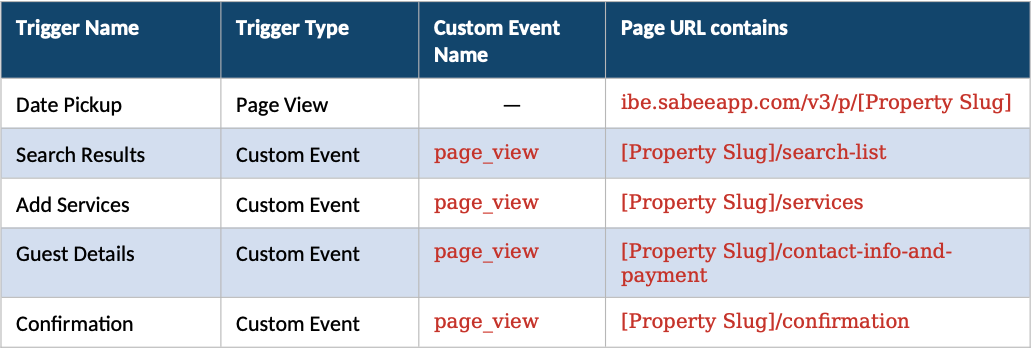
Each of the five funnel steps needs its own trigger. A trigger is what tells GTM "fire the matching tag right now". One of these five triggers (Date Pickup) is a Page View trigger, and the remaining four are Custom Event triggers, for the reasons explained in Section 3.
Throughout this section, every URL filter contains the placeholder [Property Slug]. Replace it with your own value (the one you wrote down in Section 2.4) when you create the triggers in your own container. The placeholder is wrapped in square brackets to make it easy to spot — do not leave the brackets in the actual filter value.
6.1 Date Pickup
This trigger fires the very first time a visitor opens your booking engine, on the screen where they choose their dates and number of guests. Because this is a real first page load (not a virtual SPA navigation), we use a Page View trigger here.
24. In the left sidebar, click Triggers, then click New at the top right.
25. Click the pencil icon at the top of the panel and rename the trigger to Date Pickup.
26. Click inside the Trigger Configuration box.
27. Under the Page View group, choose Page View.
28. Under This trigger fires on, select the radio button Some Page Views.
29. In the condition row that appears, set the three dropdowns / fields to: Page URL · contains - ibe.sabeeapp.com/v3/p/[Property Slug].
30. Click the blue Save button in the top-right corner.
6.2 Search Results
This trigger fires after the guest has confirmed their dates and the booking engine virtually navigates to the room-listing screen. The booking engine sends a page_view dataLayer event at this moment, and we listen for it together with a URL filter to be sure we are on the search-list screen.
31. In the left sidebar, click Triggers, then click New at the top right.
32. Click the pencil icon at the top of the panel and rename the trigger to Search Results.
33. Click inside the Trigger Configuration box.
34. Under the Other group, choose Custom Event.
35. In the Event name field, type exactly page_view. Leave the Use regex matching checkbox unticked.
36. Under This trigger fires on, select the radio button Some Custom Events.
37. In the condition row that appears, set the three dropdowns / fields to: Page URL · contains ·[Property Slug]/search-list.
38. Click the blue Save button in the top-right corner.
6.3 Add Services
This trigger fires when the guest moves to the optional extras / services screen. It uses the same Custom Event mechanism as Search Results, with a different URL filter that pinpoints the services screen.
39. In the left sidebar, click Triggers, then click New at the top right.
40. Click the pencil icon at the top of the panel and rename the trigger to Add Services.
41. Click inside the Trigger Configuration box.
42. Under the Other group, choose Custom Event.
43. In the Event name field, type exactly page_view. Leave the Use regex matching checkbox unticked.
44. Under This trigger fires on, select the radio button Some Custom Events.
45. In the condition row that appears, set the three dropdowns / fields to: Page URL · contains ·
[Property Slug]/services.
46. Click the blue Save button in the top-right corner.
6.4 Guest Details
This trigger fires when the guest reaches the contact and payment screen, just before completing the booking. Note: in some legacy containers this URL filter has been mistakenly typed as 'oila-Suites-Kas/contact-info-and-payment' (missing the leading 'V' of 'Voila' or the equivalent first character of the slug). It happens to work because the broken value is still a substring of the full slug, but it is fragile. Always type the full, correct slug here.
47. In the left sidebar, click Triggers, then click New at the top right.
48. Click the pencil icon at the top of the panel and rename the trigger to Guest Details.
49. Click inside the Trigger Configuration box.
50. Under the Other group, choose Custom Event.
51. In the Event name field, type exactly page_view. Leave the Use regex matching checkbox unticked.
52. Under This trigger fires on, select the radio button Some Custom Events.
53. In the condition row that appears, set the three dropdowns / fields to: Page URL · contains ·
[Property Slug]/contact-info-and-payment.
54. Click the blue Save button in the top-right corner.
6.5 Confirmation
This trigger fires on the final 'thank you' screen that appears after the reservation has been completed successfully. It is the most valuable trigger in the funnel, because it represents an actual booking.
55. In the left sidebar, click Triggers, then click New at the top right.
56. Click the pencil icon at the top of the panel and rename the trigger to Confirmation.
57. Click inside the Trigger Configuration box.
58. Under the Other group, choose Custom Event.
59. In the Event name field, type exactly page_view. Leave the Use regex matching checkbox unticked.
60. Under This trigger fires on, select the radio button Some Custom Events.
61. In the condition row that appears, set the three dropdowns / fields to: Page URL · contains ·
[Property Slug]/confirmation.
62. Click the blue Save button in the top-right corner.
After this section, you should see five new triggers in your Triggers list, each with a Page URL condition that contains your Property Slug. Take a moment to double-check the spelling on each one before continuing.
6.6 Trigger summary table
Use the table below as a single source of truth when you create the triggers, and again whenever you audit an existing setup.
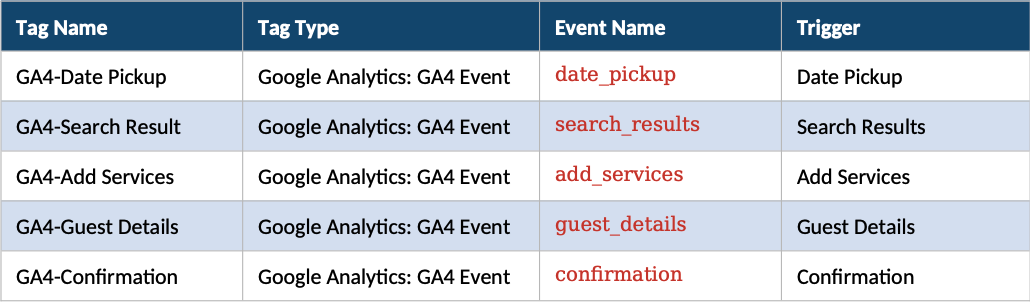
7. Step 4 — Create the Five GA4 Event Tags
With the triggers in place, the final building block is the actual GA4 event tags. Each tag is a Google Analytics: GA4 Event tag that points at the same Measurement ID variable, sends a unique event name, and is fired by exactly one of the triggers you just built.
All five tags follow the same recipe. To save space, the recipe is described once in detail in Section 7.1 and then summarised for the remaining four tags. Please follow the detailed recipe at least once carefully — by the time you reach the second tag you will know it by heart.
7.1 GA4-Date Pickup (the detailed recipe)
63. In the left sidebar, click Tags, then click New at the top right.
64. Click the pencil at the top of the panel and rename the tag to GA4-Date Pickup.
65. Click inside the Tag Configuration box.
66. Under the Featured group, choose Google Analytics: GA4 Event. (If you do not see it under Featured, scroll further down and look under Google Analytics.)
67. In the Measurement ID field, click the small Lego-brick icon on the right and select from the list of variables. The field should now display in green text.
68. In the Event Name field, type exactly date_pickup. Lowercase, with an underscore, no spaces.
69. Click Advanced Settings to expand the section, then click Tag firing options and choose Once per page. This prevents the same event from being sent twice if a trigger condition is somehow met more than once on the same page.
70. Scroll down and click inside the Triggering box.
71. Select the trigger Date Pickup that you created in Section 6.1.
72. Click the blue Save button in the top-right corner.
You have just created your first GA4 event tag. The remaining four follow the same pattern with only the name, the event name and the trigger changing.
7.2 GA4-Search Result
73, Tags → New, rename to GA4-Search Result.
74. Tag type: Google Analytics: GA4 Event.
75. Measurement ID: (selected from the variable picker).
76. Event Name: search_results.
77. Advanced Settings → Tag firing options → Once per page.
78. Triggering → choose Search Results.
79. Click Save.
7.3 GA4-Add Services
80. Tags → New, rename to GA4-Add Services.
81. Tag type: Google Analytics: GA4 Event.
82. Measurement ID: (selected from the variable picker).
83. Event Name: add_services.
84. Advanced Settings → Tag firing options → Once per page.
85. Triggering → choose Add Services.
86. Click Save.
7.4 GA4-Guest Details
87. Tags → New, rename to GA4-Guest Details.
88. Tag type: Google Analytics: GA4 Event.
89. Measurement ID: (selected from the variable picker).
90. Event Name: guest_details.
91. Advanced Settings → Tag firing options → Once per page.
92. Triggering → choose Guest Details.
93. Click Save.
7.5 GA4-Confirmation
94. Tags → New, rename to GA4-Confirmation.
95. Tag type: Google Analytics: GA4 Event.
96. Measurement ID: (selected from the variable picker).
97. Event Name: confirmation.
98. Advanced Settings → Tag firing options → Once per page.
99. Triggering → choose Confirmation.
100. Click Save.
7.6 Tag summary table
After completing Section 7, your Tags list should contain six entries: the base Google Tag created in Section 5, plus the five GA4 event tags below.
8. Step 5 — Test Everything in GTM Preview Mode
Before publishing the container to live visitors, we use GTM Preview mode to walk through the booking engine ourselves and watch each tag fire in real time. This is the single most important quality-control step in the entire setup; please do not skip it.
8.1 Launch Preview
101. In the top-right corner of GTM, click the white Preview button. A new browser tab opens with Tag Assistant.
102. In the Your website's URL field, paste the full URL of your booking engine, for example https://ibe.sabeeapp.com/v3/p/[Property Slug].
103. Click Connect. A second browser window opens showing the booking engine with a small Tag Assistant overlay confirming that GTM Preview is connected.
8.2 Walk through the funnel
With Tag Assistant connected, perform a complete reservation walkthrough using fake details:
104. Pick check-in / check-out dates and the number of guests, then continue. (This is the Date Pickup step.)
105. On the search results screen, pick any room and continue.
106. On the services screen, click continue (you do not need to actually choose any extras).
107. On the contact-info-and-payment screen, fill in fake but valid-looking contact details. Important: stop just before submitting payment unless your environment allows safe test bookings.
108. If safe to do so, complete the test reservation so that the Confirmation screen also fires.
8.3 Verify each tag in Tag Assistant
In the Tag Assistant window, you will see a left-hand timeline of every event GTM has detected. As you click each event, the right-hand panel shows which tags fired (Tags Fired) and which did not (Tags Not Fired). Verify that:
- GA4-Date Pickup fires once on the very first event in the timeline.
- GA4-Search Result fires when you reach the search-list screen.
- GA4-Add Services fires when you reach the services screen.
- GA4-Guest Details fires when you reach the contact-info-and-payment screen.
- GA4-Confirmation fires only on the final confirmation screen (and only if you completed a test reservation).
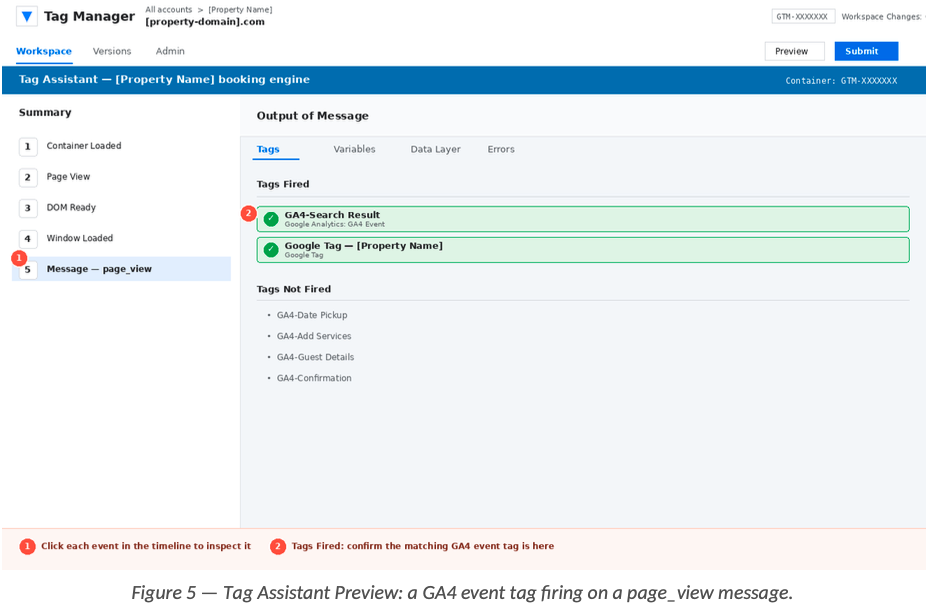
If a tag does not fire, the most likely cause is a typo in the URL filter of its trigger. Open the relevant trigger and double-check that the Page URL contains value matches the actual URL pattern of that step in your booking engine.
9. Step 6 — Verify the Events in GA4 DebugView
GTM Preview confirms that the tags fire correctly inside the browser. The next step is to confirm that the events actually arrive in GA4. The fastest way to do this is the GA4 DebugView, which shows incoming events from any browser session that has GTM Preview / debug mode enabled.
9.1 Open DebugView
109. Sign in to https://analytics.google.com with the Google account that has access to your GA4 property.
110. In the bottom-left corner click Admin, then under Property click DebugView.
111. Make sure GTM Preview mode (from Step 5) is still connected in the other browser tab. As long as Preview is connected, GA4 will treat that browser session as a debug session.
9.2 Watch the events arrive
Switch back to the Preview window and slowly walk through the funnel again. As you reach each step, look at the GA4 DebugView; events should appear in the central event stream within five to fifteen seconds. The five events to look for, in this exact order, are:
- date_pickup
- search_results
- add_services
- guest_details
- confirmation
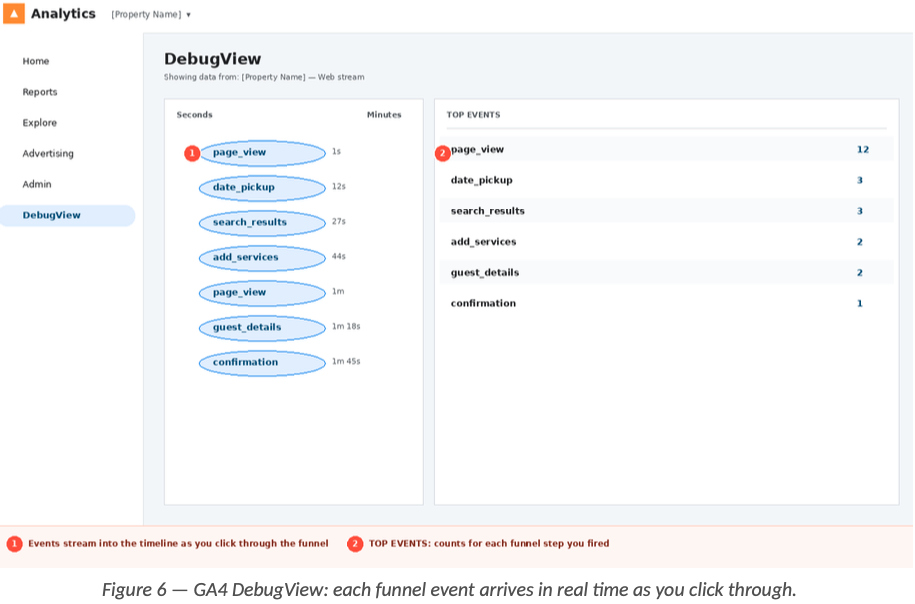
If you see all five events in DebugView with the correct names and in the correct order, congratulations: the technical part of your SabeeApp BE measurement is fully working.
9.3 (Optional) Register custom dimensions later in GA4
Out of the box, the five events will be visible in GA4 reports such as Reports → Engagement → Events, and they can also be used inside Explore reports as steps in a funnel exploration. If, in the future, you want to slice the events by an event parameter (for example by room type), you will need to register that parameter as a custom dimension under Admin → Custom definitions in GA4. This is outside the scope of the GTM setup itself, but it is the natural next step once the basic measurement is in place.
10. Step 7 — Submit and Publish the Container
Once everything is verified, the final action is to publish the container so that the changes take effect for all your real visitors (not just for your Preview session).
112. Close the Tag Assistant Preview tab to disconnect Preview mode.
113. In the top-right corner of GTM, click the blue Submit button.
114. In the Submission Configuration screen, choose Publish and Create Version.
115. Give the new version a clear Version Name — for example SabeeApp BE GA4 funnel — initial setup — and add a short Version Description describing what this version does.
116. Click the blue Publish button in the top-right corner.
From this moment on, every real guest who walks through the booking engine will produce one GA4 event per funnel step, and these events will appear in your standard GA4 reports within minutes (not in DebugView, which only shows debug sessions).
11. Troubleshooting
A tag never fires
In almost every case the root cause is either (a) a typo in the URL filter of the trigger or (b) the wrong trigger attached to the tag. Open the trigger that should fire the missing tag and verify that the Page URL contains value exactly matches the URL pattern of that funnel step in your own booking engine. Pay particular attention to capital letters and dashes inside [Property Slug].
Two events fire on the same step
If both Date Pickup and Search Results fire on the very first screen, it usually means the booking engine is also pushing a page_view dataLayer event on the initial page load. The fix is to keep the URL filter on the Search Results trigger as strict as possible (it should contain /search-list), so that it only matches the actual search results screen.
DebugView is empty
Make sure GTM Preview mode is still connected in another tab in the same browser. DebugView only shows sessions that are running in debug mode. If Preview is closed, no events will appear, even though the tags are working correctly for real users.
Real reports are still empty 24 hours later
First check that the container has actually been published (not just saved). Go to Versions in GTM and confirm that the latest published version is the one that contains your five GA4 event tags. Then check that your GA4 Measurement ID is correct: open the GA4-Measurement ID variable and confirm that the value matches the Measurement ID shown inside GA4 → Admin → Data Streams.
URL filter typos in legacy containers
Some older containers contain a small typo in the Guest Details trigger, where the Property Slug is missing its first character (for example oila-Suites-Kas instead of Voila-Suites-Kas). Because the truncated value is still a substring of the full slug, the trigger still fires, but it is brittle and confusing. Whenever you see this pattern, please fix it by typing the full, correct slug into the filter.
12. Quick Setup Checklist
Use this list as a final pre-flight check, ideally with a colleague reading it out loud to you while you click through your container.
- Variable: GA4-Measurement ID exists, type Constant, value G-XXXXXXXXXX (your real ID).
- Tag: Google Tag - Page View exists, type Google Tag, fires on Initialization - All Pages.
- Trigger: Date Pickup, Page View, fires when Page URL contains [ibe.sabeeapp.com/v3/p/PropertySlug].
- Trigger: Search Results, Custom Event page_view, fires when Page URL contains [PropertySlug]/search-list.
- Trigger: Add Services, Custom Event page_view, fires when Page URL contains [PropertySlug]/services.
- Trigger: Guest Details, Custom Event page_view, fires when Page URL contains [PropertySlug]/contact-info-and-payment.
- Trigger: Confirmation, Custom Event page_view, fires when Page URL contains [PropertySlug]/confirmation.
- Tag: GA4-Date Pickup, GA4 Event, event name date_pickup, trigger Date Pickup, Once per page.
- Tag: GA4-Search Result, GA4 Event, event name search_results, trigger Search Results, Once per page.
- Tag: GA4-Add Services, GA4 Event, event name add_services, trigger Add Services, Once per page.
- Tag: GA4-Guest Details, GA4 Event, event name guest_details, trigger Guest Details, Once per page.
- Tag: GA4-Confirmation, GA4 Event, event name confirmation, trigger Confirmation, Once per page.
- All five events appear in GA4 DebugView while GTM Preview is running.
- Container is Published (not just saved as a draft version).
If every box is ticked, the SabeeApp BE measurement is live for [Property Name]. From here on, the data will flow into GA4 automatically with no further intervention needed.