How to Create and Handle Group Bookings
Group bookings in SabeeApp can be created and managed in several ways to simplify handling multiple reservations under a single group. Whether entered manually, received via your booking engine, or from connected OTAs, SabeeApp ensures all group bookings are organized and easy to manage.
🛠️ Ways to Add a Group Booking
You can add a group booking to SabeeApp using one of the following methods:
-
Manually via the Calendar Overview
-
Directly through your Booking Engine
-
Automatically from connected OTAs or partners
✍️ Adding a Group Booking Manually
To manually add a group booking:
-
Go to the Calendar Overview.
-
Click the group booking icon (a person with a "+" sign) located above the calendar.

-
A pop-up window will appear, giving you two options:
-
Create a new group reservation
-
Add reservations to an existing group
-
🔧 Group Booking Setup
In the group booking window:
-
Group Name: Give your group a name.
-
Group Colour: Choose a colour to visually represent the group on the calendar.
- Booker name: Select an individual who is the booker for the group
-
Booking Details: Select the date range, room types, and the number of rooms needed.
-
SabeeApp will display real-time availability so you can instantly check what’s available during the selected period.
-
Add rooms and guests to the group. As you add rooms, a summary of the group’s total will appear at the bottom.
-
The Booker’s name will be automatically assigned to all reservations.

🧾 Adjusting Reservation Details
On the next screen:
-
Set the number of guests per room
-
Adjust departure dates (useful for staggered check-outs)
-
Assign rate plans and adjust pricing as needed
-
See a quick summary of the group booking
-
Optionally modify the total group price

Once ready, click “Add and show calendar or Add and show reservation” to complete the process.
Your group booking will now appear in the calendar, clearly marked with the colour you selected for easy identification.

🧩 Managing Group Bookings
Once the group is created, you can manage it directly from the Calendar:
📋 Group Booking Pop-Up
Click on any reservation within the group to open a quick view pop-up showing:
-
Total amount for the entire group
-
Individual details of the selected reservation
-
Access to:
-
The reservation detail page
-
Check-in options (individual or group)
-
Onboard entire group after check-in

-
✏️ Additional Group Booking Actions
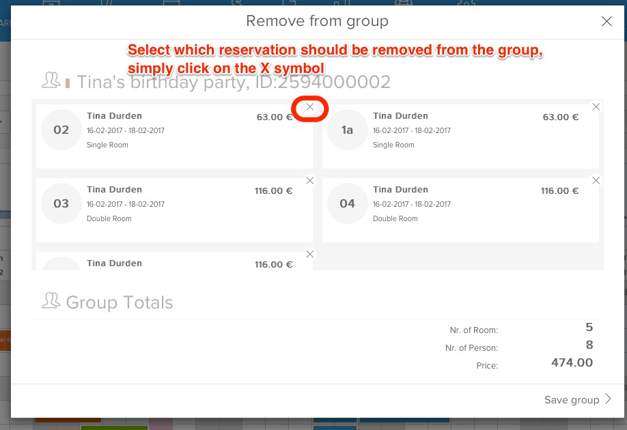
Remove Individual Reservation from the Group:
To split a guest from the group:
-
Open the group booking quick view pop-up.
-
Click the “-person” icon.
-
Click the X next to the reservation you want to remove.
⚠️ This option is disabled once a group invoice has been issued.

Add a New Reservation to a Group:
If the booker adds more rooms later:
-
-
Create a new reservation in the calendar.
-
Open the specific group booking quick view pop-up.
-
Click the “+person” icon.
-
-
-
Drag and drop the individual reservation into the existing group.

-
-
Group Check-In:
Use the Group Check-In button to check in all guests at once. -
Print Group Check-In Cards:
The Print Group option allows you to generate check-in cards for all group members. -
Cancel Entire Group Booking:
With one click, cancel all reservations in the group—no need to cancel each separately.
🌐 Group Bookings from Booking Engine or OTAs
If a group booking comes through your:
-
Booking Engine, or
-
Connected OTAs (via XML integration)
...SabeeApp will automatically group those reservations for you.
-
The Booker field will always be filled in
-
Guest details will be included if the OTA provides them via XML
✅ Summary
SabeeApp makes it easy to handle group bookings efficiently—whether they’re made manually or received online. Use calendar tools, bulk check-in, and group management features to save time and deliver a smooth guest experience.