List view

In the list view you can find all the individual reservations, which are currently in your SabeeApp account. This list contains absolutely all reservations ever made in Sabee: cancelled, no shows, past and future reservations.
Under list view menu you find several filters which help you to specifically find the reservations that you are looking for.
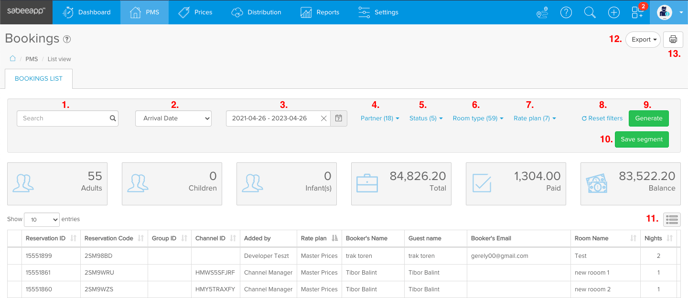
Let's see what is the meaning of these buttons:

- Search field: here you can enter the guest's name, reservation ID, channel ID or group ID, or you can even search according to the guests' email address. After click on the Generate button and the system will filter the reservations according to your criteria. If you have found your reservation, click on it and the detailed reservation page will appear.
- Date filter: it helps you to find bookings according to 4 options: arrival time, departure time, date of booking and the date of modification.
- Date picker: you will see that we have already defined time intervals, but if you would like to apply different ones, select the "Custom" option.
- Partner: by partners we mean the connected sales channels / OTAs (such as Booking.com, Expedia), plus all the other offline partners (tourist agencies) which you added in Settings / Partners menu.
- Status: this filter is for the reservation statuses. You can find 4 reservation statuses in the system: confirmed, cancelled, option and no-show. Under status, you can filter for any of these four.
- Room type: you can check all your bookings separately for any of your room type.
- Rate plan: you can check all your bookings separately for any of your rates. First you can select what category of rate plans you would like to check and after this you can select the rate plans under the category. By default we have set for you only the Rate plans managed by SabeeApp but you can choose to further extend the list.
- Reset filters: By clicking on this link, you can remove all filters of the search.
- Generate button: After adjusting the fliters, please always click on the Generate button to complete the search.
- Save segment: You can save your search criteria with this button. Learn more about segments here.
- Column picker: with the help of this button you are able to choose which columns should be visible in the table. It also refers to the exported lists. Those columns which are not ticked, won't be visible neither in the table, nor in the exported file.
- Export: You can export your search results to an Excel or .csv file.
- Print: It is also possible to print out the list of the search results or save it as PDF with this button.
List View displays the information from the detailed reservation page. The order of the columns in the table is adjustable with the "drag and drop" method.
If you have any Custom fields created in Settings / Custom fields menu, you can add them to the table of the the List View. The custom fields will be displayed as separate columns and you can edit them in the table. You just need to click on the cell and a small pencil sign will appear:

In the Bookings / List View you find a small statistic section as well:

If you have no filters set, these numbers refer to all of the reservations that are in the list.