This guide provides a comprehensive, step-by-step walkthrough for configuring and optimizing the GuestAdvisor. Designed to simplify your setup process, it takes you through each setting in detail, ensuring that you can make the most of GuestAdvisor's features. Whether you're a new user or looking to refine your existing configuration, this guide offers clear instructions and practical tips to enhance your user experience, making it easy to tailor GuestAdvisor to meet your specific needs.
Please download the guide from here or follow the instructions below:
Step 01: Activating GuestAdvisor in the Smart Solutions Module
1. To activate the Smart Solutions module, which includes GuestAdvisor, follow these steps:
• Go to Settings and select Subscription.
• Locate the Smart Solutions toggle.
• Switch the toggle to green to activate it.
 This will start your 15-day free trial.
2. After switching on the Smart Solutions module, a new menu will appear in the menu bar next to Settings, called: GuestAdvisor Tools. This menu will only be available for the owner login, however the account owner can give permission to any other user to see and to apply settings for the GuestAdvisor, in the Accounts / User account section, by ticking the permission for GuestAdvisor.

Step 02: Let’s Make the App Look Nice
2.1 GuestAdvisor Tools/Colour and background menu
1. Background photo
Here you can upload the main background photo of the app, keeping in mind the following:
• minimum size should be: 1000x650 pixel
• file type should be: JPG
• orientation should be: landscape

2. Colours
Here you can change the colours of the Menus. You can use the colour picker or enter a HTML colour code which contains symbol "#" and 6 letters or numbers.
For example: #00000 which is black.
• Primary colour: Important information
• Highlight 1 colour: Content sub-headers
• Highlight 2 colour: Main menu buttons
• Hotel title colour: Hotel / Accommodation name

2.2 Menu & Content
• How to leave your room: please see detailed information about this menu on page
• About us: Any information you want to share with you guests about your property
• My Reservation: Shows the reservation details
• My Expenses: Shows all the expenses related to the reservation
• Services: Services can be booked through the GuestAdvisor
Application by applying this setting in the Service List menu. For more
information please see page 7.
• After check-in info: Any useful information can be added here.
How to change the order of Menu items?
Drag and drop in the required order

2.3 Creating extra content page
In addition to fixed menus like My Expenses, My Reservation, and Services, you
can create up to five custom content pages about any topic. Here are a few examples:
• How to get to your property
• Restaurants & bars in the neighbourhood
• Sightseeing guides for your location
• Special services at your accommodation
Tips for writing good content pages
There is no length limit for content pages, but remember that guests will be reading them on
mobile devices, so keep them short and concise. You can upload individual images for each
content page. Basic formatting options such as font styles, bold, italic, bullet points, and links
are also available.
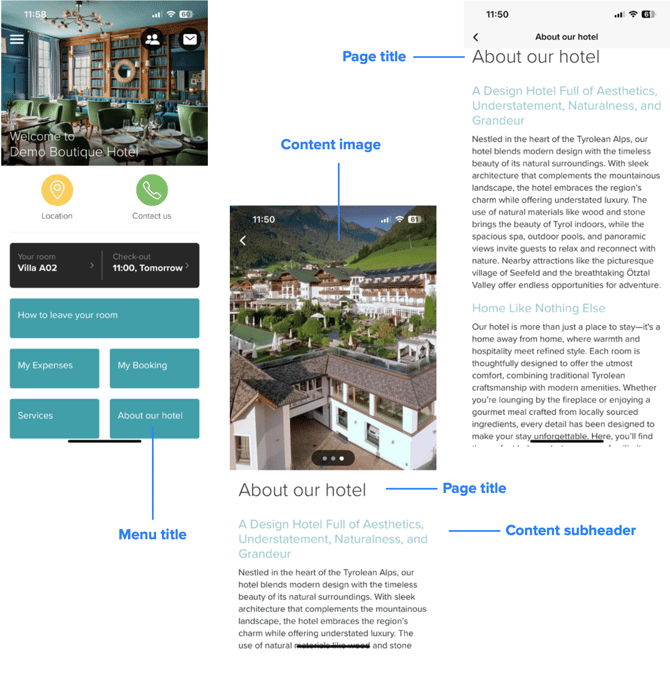
Menu title: The text appears on a menu item
Page title: The text appears on the top of your content when it's opened
Size: You can decide the menu item displayed as half or as full width
Content: Your content comes here
Content image: The image you want to appears at the top of your content
2.4 Setting up services
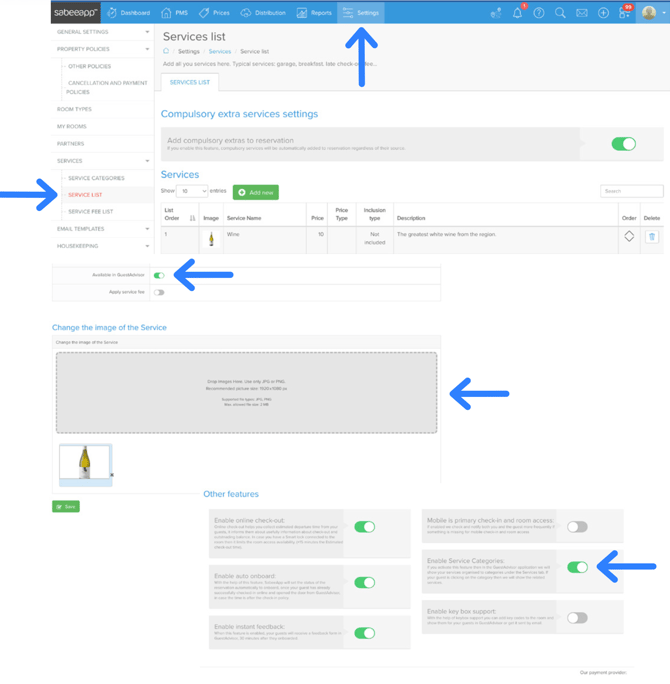
Services can be booked through the GuestAdvisor Application by applying this setting in the Service List menu.
• To start using this feature, please navigate to the Settings → Services → Services list menu.
• To enable a service for GuestAdvisor click on the service itself and scroll down to the bottom of the screen until you see "Available in GuestAdvisor”. Enable this tickbox
• We also recommend to upload an image for the service. If no image is uploaded the GuestAdvisor app displays a default image
Grouping services in the same category
If you have multiple services in the same category (e.g., drinks), you can group them
together. To enable this feature, follow these steps:
1. Go to GuestAdvisor Tools Settings.
2. Select Other Features.
3. Find the toggle labeled Enable Service Categories and switch it to green.
Step 03: Setting up Online Check-in
3.1 Configuration options (GuestAdvisor Tools / Settings menu)
The online check-in feature allows guests to check in conveniently through the GuestAdvisor Application and Customer Portal. To set up online check-in, follow the instructions below:
• Enable online check-in: Putting this toggle to green enables guests to check-in through the GuestAdvisor Application and Customer Portal link.
• Online check-in period before arrival (in days): This setting defines how many days in advance you want to request that guests complete their online check-in. It determines when guests will automatically receive their first online check-in email.
• Partial check-in: When the toggle is grey, all guests must fill out their details to check in. When green, only one guest is required to check in; the rest are optional.
• Guest document (ID) scanning: there are four options here, which helps you define
whether you require guests to scan their ID document as part of the check-in.

Important Note
To use the online check-in feature in GuestAdvisor, the room must be set as a room. If the Room Type (Subtype) is configured as a conference room, technical room, or garage, guests will not be able to check in through the GuestAdvisor app.
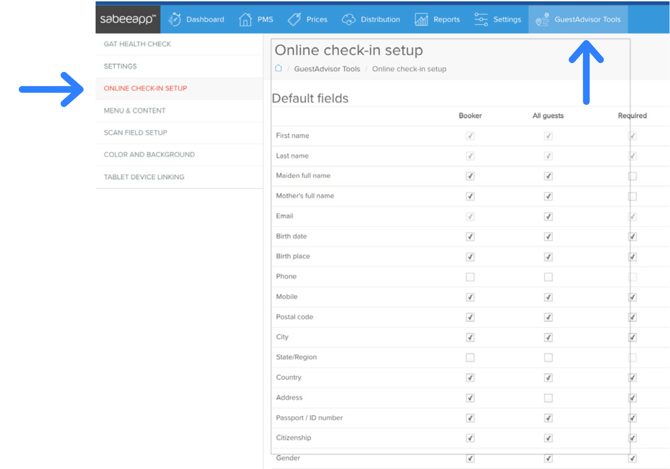
3.2 Configuring required information for online check-in
This guide will help you configure which information you require from the booker and guests during the online check-in process. You can determine which fields are mandatory and which are optional.
Setting up required information
• You will see a list of information fields available for guests and bookers (e.g., maiden name, contact details).
• To make a field mandatory, tick the box labeled Required next to the relevant information. Guests will not be able to complete the check-in process without providing this information.
• If the Required box is not ticked, the information will be optional for the guest to provide. Guests can complete their check-in even if these fields are left blank.
Example:
• Maiden name requirement:
◦ Required: If the maiden name is marked as required for both guests and bookers, they will be unable to check in without entering this information.
◦ Optional: If the maiden name is not set as required but appears on the ID document, it will still be scanned, but guests can check in without manually entering it.
Important Notes
• Ensuring Complete Check-In: Make sure all essential information is marked as required to ensure you have all the necessary details before the guests arrive.
• Balancing Flexibility: Consider which fields can remain optional to provide a smoother and faster check-in experience for your guests. By carefully selecting required information, you can streamline the check-in process and gather all necessary guest details efficiently.
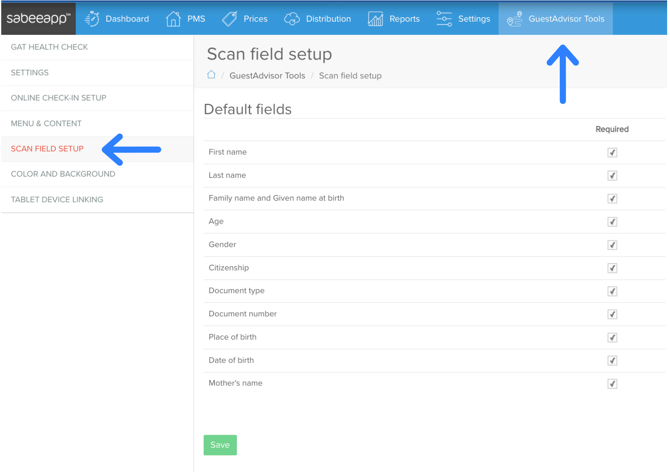
3.3 Setting up the ID scanner
In this menu (GuestAdvisor Tools / Scan Field Setup) , you can control which fields the applications (Front Office Manager and GuestAdvisor Mobile) scan from your guests' travel documents. You can customise these fields according to your needs by ticking or unticking the boxes next to each field.
• If you are using any type of guest data report tool, such as: VIZA (Hungary), Spanish Police Guest Book (Spain) or Bizim Hesap and police report (Turkey) then the complusory fields for these reports are set already for your account and they are also locked. If you would like to scan some extra details from the travel documents just feel free to mark them and then hit Save.
Important Notes
If a travel document does not contain certain information that is marked as required, the scanning will still be successful. Most guest data reporting systems only require you to report information that is actually contained in the travel document.
Step 04: Settings for Post Check-In Actions
4.1 GuestAdvisor Tools/Settings/Auto-onboard feature
Setting this feature to green automatically marks reservations as "Onboarded" (green in the calendar view) in two cases:
1. Smart Lock integration is active, the guest has checked in, and uses the Room Access button in the GuestAdvisor Application to open the door for the first time within the check-in period.
2. The Keybox support feature is enabled, the guest has checked in, and they first tap the Room Access button in the GuestAdvisor Application or Customer Portal.

4.2 Instant feedback feature
• With our Instant Feedback function, you can automatically send a feedback form to your guests. The form consists of four questions and will appear as a pop-up in the GuestAdvisor app 30 minutes after a reservation is marked as "Onboard" in your PMS.
• Please note that Instant Feedback only works if your guests have completed the online check-in using the GuestAdvisor mobile app. Additionally, you must onboard your guests in the PMS for the feedback process to be triggered. Once a guest is onboarded, SabeeApp automatically sends the feedback form, which appears as a notification in the app. If the guest has enabled notifications, they will receive the alert on their device, even if the app is not open.
• The form contains four multiple-choice questions and one open- ended question. Currently, you cannot modify the questions or their order. The questions are as follows:
1.How easy was to open your reservation in GuestAdvisor?
2.How was your check-in experience?
3.How did you like our staff so far?
4.How clean was your room?
5.Anything else you would like to share with us?

4.3 How feedback appears after completion
- Once a guest has completed the feedback form, you'll notice an additional item in the right-side toolbar on the detailed reservation page. This indicates that feedback has been submitted.
- For the three multiple-choice questions, responses are displayed using four emojis: sad, neutral, somewhat happy, and very happy. These emojis are converted into points as follows: sad = 1, neutral = 2, somewhat happy = 3, and very happy = 4. The points are then multiplied by 2.5, resulting in a rating range of 2.5 to 10 for each category. These points are displayed under the guest review section, with the total score being the average of the three individual scores.
- Additionally, any comments provided by the guest in response to the fourth question will appear here. You can also view details about the guest’s onboarding time and the staff members who assisted them.
- We offer a report summarising your Instant Feedback performance, which you can access by navigating to the Reports > Review menu. This report provides a comprehensive overview of feedback trends. If feedback has been received in the last seven days, a quick report will also be displayed on the left side of the Dashboard.

Step 05: Room Access Set-up
5.1 Keybox support settings
Important: Keybox support can only be activated when there is no other active smart lock connection.
Activating Keybox Support
To enable Keybox support, follow these steps:
1. Turn on Keybox support
• Go to GuestAdvisor Tools / Settings and switch the toggle to green to activate Keybox support.
2. Set up Keybox codes and instructions
• Navigate to the Settings menu and select My Rooms.
• Click on the desired room you wish to configure.
3. Activate the Keybox for the room
• Toggle the option Use keybox for the room to activate it.
4. Configure Keybox details
• Two fields will appear for configuration:
Keybox code: Enter a code consisting of 4 to 10 digits (numbers only).
Keybox information: Provide details to help guests identify the correct key box. This information will be shared with them via GuestAdvisor or email. Repeat steps 1-4 for all rooms where you want to use Key Box support.

5.2 Informing guests about Key codes and Keybox information
Guests are informed about their key code and keybox information through an automated email and the GuestAdvisor application. Here’s how it works:
Email notification
• Email Template: A new email template has been added to your account. To view and edit it, go to Settings > Email Templates > GAT Templates.
• Customising the Email: You can customise the content of this email and schedule when it will be sent to guests. The email can be sent anytime from the arrival date up to 5 days before arrival.
• Email Sending Conditions: Guests will receive this email only if they have completed the online check-in through the customer portal or if their reservation is marked as checked-in by the staff.
• Language Settings: The system will send emails in your selected default language.
GuestAdvisor Application
• Room Access Button: Once guests have checked in, a Room Access button will appear in the
GuestAdvisor app in grey.
• Activation of Room Access: During the check-in and check-out period, the Room Access button will turn blue. Guests can tap on it to view their key code.
• Keybox Information: After tapping the Room Access button, guests can select How to access your room to see the keybox information saved in the My Rooms settings.
Reservation-specific codes
You have the flexibility to customise the access code for each reservation individually. By default, our system will apply either the initial room access code or the code used for the previous reservation.
Step 06: Managing Partner-Specific
- When a partner is selected in this list, guests associated with that partner will not see the accommodation fee in the GuestAdvisor application. They will only see the fees for any additional services they have booked. Use this when the partner collects payment.
- Note: if a partner is selected, for reservations coming from that partner, SabeePay payment method will not be available in GuestAdvisor.
- If you want to display the accommodation fee to guests from that partner again, simply uncheck the box next to the partner's name

Step 07 GuestAdvisor Language Settings
7.1 Language settings for GuestAdvisor mobile app
In this section, you can choose which languages to activate for the GuestAdvisor mobile app. To activate a language, simply check the box next to the desired language.
Important Notes
• Complete Translations Required: A language can only be activated if it is 100% translated. If
any translations are missing, a "Show missing translations" link will appear. Click this link to view and complete the missing translations.
• Default Language: You can set a default language for the app. This default language will be used to fill in any missing translations for enabled languages if new content is added.
• Automatic Language Detection: The GuestAdvisor app will automatically detect and display the language based on the guest’s phone settings, provided that language is available.

Step 08: Setting up Online Check-out Feature
8.1 Configuring online check-out
- By enabling online checkout, it allows you to see when your guests plan to leave their room and provides them with relevant information on when and how to check out. Guests will also be notified of any outstanding payments for their reservation and how to complete them. GuestAdvisor's online check-out feature is currently available only in the GuestAdvisor Application.
- If a guest checks in via the mobile app and completes the online check-out by providing their departure time, the PMS will automatically update the reservation status to "checked-out" at the specified time.

8.2 How the Online check-out tool looks like for guests?
If a reservation's check-out time is within the next 24 hours, the following button and text will appear on the main screen of the GAT Mobile application.
• If the guest has enabled push notifications for the app, we will also send a notification about the online check-out to their mobile phone.
• By clicking on "Set Check-Out Time," the guest can access the online check-out window, where the following information will be displayed.
• By clicking the arrows next to the clock, guests can set their estimated check-out time.
• If a NUKI, Salto KS or AssaAbloy Smart Lock is connected to the room, they will be notified that their smart lock key will expire 15 minutes after the set check-out time. This message will not appear if no smart lock is connected.
• If there is any outstanding payment according to their SabeeApp reservation, guests will be reminded to visit the front office to settle it. This reminder will not appear if there is no amount due.
• Once the desired check-out time is set, guests can click the green "Confirm Check-Out Time" button.

Guests will then be redirected to a page with two options:
1. Review the "How to Leave Your Room" information provided. An example is shown on the screenshot.
2. Tap the “Close” button to return to the main menu of the application.
• On the main page of the application, the selected check-out time will be displayed. By clicking on the time guests will be able to modify the time and "How to Leave Your Room” button will give them further checking out advise.
• Guests can change their check-out time as often as they like, within the constraints of the latest possible check-out time defined in the Settings under Property Policies. Check-out times can be adjusted in 30-minute intervals.

• If an estimated check-out time has already been provided through other means, the "Modify Check-Out Time" option will appear by default when the reservation enters the 24-hour window.
• For example, if your staff set a custom check-out time on the reservation page, it will be displayed in the application, but the guest can still modify it.
• We track and log any changes to the estimated check- out time in the reservation's change log.
Examples can be found here:

Step 09: GAT Health Check Feature
The GAT Health Check tool helps you monitor and ensure the proper functioning of your GuestAdvisor applications. This tool gives you complete control over potential issues, allowing you to resolve them before your guests encounter any problems.
1. Reservation check tool
The Reservation Check tool allows you to verify if a guest is eligible for online check-in and Smart Room access (if using Assa Abloy or NUKI locks). Simply copy the Reservation Code from the guest's reservation page, paste it into the field, and click "Check." A new tab will display any errors for these features. If everything is set up correctly, we will confirm their availability.
2. Common issues for online check-in:
• Missing check-in legal policy.
• No cancellation and payment policies assigned, and general, check-in/check-out, or group policies are not configured in SabeeApp.
• Reservation is outside the check-in window (0-30 days) set under GuestAdvisor Tools / Settings.
• Reservation is not confirmed (usually for optional reservations). Confirm the reservation before sending out the GAT email manually.

3. Common issues for Smart Room Access:
• Reservation is not in "Checked-in" status.
• Guests have not completed online check-in.
• Guest hasn’t been Onboarded, which often happens when the Auto-Onboard function is not on.
4. Health Check Tool
• Missing check-in legal policy.
• No cancellation and payment policies assigned, and general, check-in/check-out, or group
policies are not configured in SabeeApp.
• Reservation is outside the check-in window (0-30 days) set under GuestAdvisor Tools / Settings.
• Reservation is not confirmed (usually for optional reservations). Confirm the reservation before sending out the GAT email manually.
